Transfer Time |
![]()
| The Transfer Time routine allows the user to transfer posted time from one
Client to another, from one Matter to another, or from one Timekeeper to another. When
transferring time, the user must first execute their query using criteria pertaining to
the time entries that are to be transferred. For example, to transfer Time Entries
between February 13 and February 17 from Timekeeper # 7 to Timekeeper # 9, the user must
use those details as criteria when entering their query. Once the query is executed, the
query results will be displayed in the Time Entry Details section, and the user may then
select from the results which time entries are to be transferred. Note:
Only posted Time Entries can be transferred between Clients and/or Timekeepers, and only
Time Entries in their entirety can be transferred (i.e. the user cannot transfer part of a
Time Entry). The View Time Entries routine can act as a reference when
transferring Time Entries, as it will display all Time Entries within a specified time
period. When the Transfer Time routine is accessed from the eQuinox main menu, the screen shown below will be displayed. |
| Field Definition |
|
|
|
| The first two fields on this screen display the Journal Type (TMT) and the Journal
Number. Date Acct Period |
|
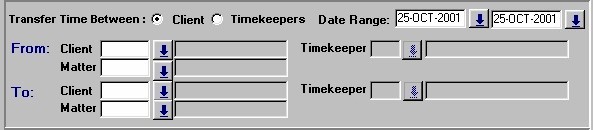
Transferring Time Between Clients When transferring Time Entries between Clients, the user must first select the Transfer Time Between Clients option by simply clicking on the Clients field. When the Client option is selected, the From Client/Matter and To Client/Matter fields become enabled, allowing the user to enter the information. When transferring Time Entries between Clients, the Timekeeper fields are disabled. |
|
| Date Range The user must enter the dates representing the time period for which they wish to transfer Time Entries. The dates can be selected from the Calendar provided. Note: To return Time Entries from the first Time Entry up to a specified date in the query results, the user can leave the first date field empty (i.e. useful if the date of the first Time Entry is unknown). To return Time Entries from a specified date up to the most recent Time Entry in the query results, the user can leave the second date field empty. Also, to not limit the query results to within a specified date range, both date fields can be left blank.
From Client/Matter To Client/Matter |
|
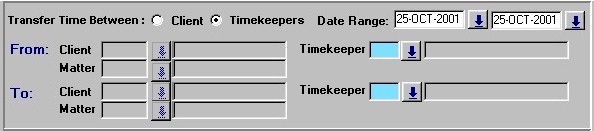
Transferring Time Between Timekeepers When transferring Time Entries between Timekeepers, the user must first select the Transfer Time Between Timekeepers option by simply clicking on the Timekeepers field. When the Timekeeper option is selected, the From Timekeeper and To Timekeeper fields become enabled, allowing the user to enter the information. Note that the Client/Matter fields are disabled when transferring Time Entries between Timekeepers. |
|
| Date Range The user must enter the dates representing the time period for which they wish to transfer Time Entries. The dates can be selected from the Calendar provided. Note: To return Time Entries from the first Time Entry up to a specified date in the query results, the user can leave the first date field empty (i.e. useful if the date of the first Time Entry is unknown). To return Time Entries from a specified date up to the most recent Time Entry in the query results, the user can leave the second date field empty. Also, to not limit the query results to within a specified date range, both date fields can be left blank.
From Timekeeper To Timekeeper |
|
Time Entry Details The screen section seen below display the query results. From these records, the user must select the Time Entries that are to be transferred. The Time Entry information that is displayed is as entered in the Maintain Time Entries routine, and cannot be edited by the user. Note: Since the records that are displayed in this section are all posted entries, they are displayed in grey, thus making it difficult to tell at a glance which is the currently selected record. To make this easier, simply look for the Transfer Y/N check box that is outlined in blue (as seen below). |
|
|
Sel The Yes/No (checked/unchecked) value of this field indicates whether or not the current record is selected to be transferred. To select all records for transfer, the user may simply click the "Green Check Mark" button. Time ID |
|
Tran Date Tmkp Client Matter Task Code Bill
|
|
| Hr/Flat The value of this field indicates whether the rate displayed in the Rate field is an Hourly Rate (i.e. "H") or a Flat Rate (i.e. "F"). If it is an hourly rate, the Client is charged that rate for every hour entered; if it is a flat rate, the Client is only billed that amount, regardless of the number of hours entered. |
|
Rate Hours Fees Verb Obj Custom |
|
|
|
|
Description The Time Description for the current Time Entry (way in which the Time Entered was spent working on the Matter). The Description may either be typed manually, or entered through the use of Time Codes. Timekeeper Name, Client Name,
Matter Name Total Hours, Total Fees Total Amount Selected to Be Transferred |
|
Once the user has selected all the Time Entries that are to be transferred, they must then click the Save button. When the Time Transfers are complete, the message seen on the left will be displayed to the user. |
![]()