Matter Move (Client to Client) |
![]()
| The Matter Move form allows the user to move a
Matter from one Client to another. When a Matter move is performed, everything associated
with that Matter is also moved to the new Client (i.e. unbilled time, outstanding AR,
etc). When moving Matters, the system will ensure that the new Matter number that has been
assigned is unique (i.e. in "Matter First" systems, the number must be
unique to the
system and to the Client; in "Client First" systems, the number must be unique
only to that Client. See below for more info). In addition, the system will ensure that
the user has not selected to move a Matter to a Client whose file has been closed.
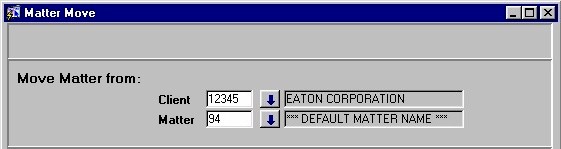
When the Matter Move routine is accessed from the eQuinox main menu, the screen shown below will be displayed. |
| Field Definition |
|
|
|
|
Move
Matter From: Client/Matter In this section, the user must specify the Matter that is being moved, and the Client with which the Matter is currently associated . The user may either manually enter the unique identifiers of the Client (i.e. maximum of 10 characters) and Matter or make selections from the Look-Up forms provided. |
|
|
Move
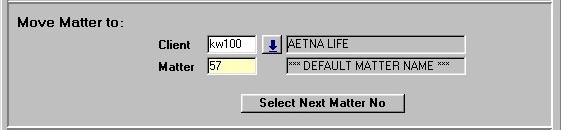
Matter To: Client/Matter In this section , the user must specify the Client to which the Matter is being moved, and then ensure that the Matter is assigned a unique Matter number. To specify the new Client, the user may either manually enter the unique identifier of that Client (i.e. maximum of 10 characters), or make a selection from the Look-Up form provided. Once the user tabs out of the Client field, the Matter name is automatically displayed in the Matter field (i.e. when moving a Matter, the original Matter name is kept and cannot in any way be edited through this routine). If the system is set to be "Matter First" (i.e. where Matter numbers are unique to the system, not just to the Client), the original Matter number is also automatically displayed in the Matter field. See below for more information.
NOTE: Selecting and/or
Assigning Matter Numbers |
|
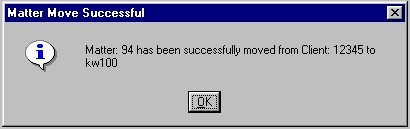
Once the Matter has been assigned to the new Client and has been given a unique number, the user must either click the Save button or press F10 to commit the changes to the database. Once the move is complete, the user will be presented with the confirmation message seen on the left. |
![]()